We recently published a piece by Budgie Burgess, showing how he makes his own pike fishing traces. You can view the article here.
You’d think that brothers would do things pretty much the same, but Budgie’s brother, Andrew, does them quite differently and Budgie asked him to send some details in.
Here’s how Andrew makes his traces. Apologies if some of the photos aren’t that clear, but you should get the idea from the text. Thanks to Andrew for sharing this with us.
Right this is not easy to do and its does require patience and practice. This is my version of ‘how to make a pike snap tackle’. I’ll cover a spinning trace separately.
The main important thing you need to get is a work board that is made of wood. This will be your main feature for making your prototype pike snap tackle and spinning traces. The wooden board must be over 40″ long x 20″ wide. This will cover a maximum of 6 different pikerigs trace. You also need some masking tape to mark the board, like this;

On the masking tape, you need to work out and mark out where the hooks, swivels, etc. will go, like this;

The general rule is the pike snap tackle must be over 18″ long and the hook spacing can be anywhere between 2″ to 3 1/2″ long, but mine are variable depending on the size of deadbait or livebait.

Now you can go out and buy some bits and pieces for the trace-making. My preferences are Fox Pike Tackle because I have used them over the years and they have always been reliable to me, but it is up to you on what brands of tackle you buy, but you will have to make some few modifications.
Tackle items that you may require to make pike snap tackle and spinning traces;
Fox Trace Blade/cutter
Fox Easy Twist Trace Wire – 20lb B.S. or 30lb B.S.
Fox Easy Twist Twiddling Stick or a forceps will do.
Fox Trace Crimp Covers
Fox Treble Hook Covers
Fox Treble Hooks in Size 6 & semi barbed – This is the general size, which covers most piking situations.
Fox Power Swivels in size 5 , 7, 10
{I have linked these product names to searches on eBay. If you click on them, it should give you an idea of what each item costs – Ed}

You can either use the 20lb B.S or 30lb B.S. wire trace. Again, it is up to you, but in my case this is a 20lb B.S. which I am using at the moment.
Cut off a length of wire trace at 25″ long

Heat up the first 1/2″ by using a lighter – this helps to make the wire softer, which will make it easier to twist or wrap.


Right once you have heated the first 1/2″ of wire, then you need to bend it over like this;

So the whole idea is to do this

I painted it white to show how it fit into the bend of the treble hooks)
Then you start wrapping the wire trace around the shank of the hook six times;

And thread the wire through the eye like this;

When doing this you must keep the wire trace tight, otherwise it won’t work.
Once the wire is nice and tight to need to put either a silicone tubing or one of the Fox Hooks Covers to keep the wire in place.

Thread the cover on to the hook, so it ends up like this;

Right, that’s the first section of the treble hook done, now for the second fixing of the treble hook.
Depending on the size of either a deadbait or livebait, hook spacing should always in between 2″ to 4″ apart. Any wider will risk the deephooking of a pike, so the hook spacing should be like this;

So, gently thread the wire through the eye of the second treble hook and into position like this;

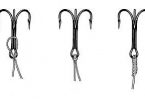
Fixing the upper hook has lead to a great deal of ingenuity. The simple method of fixing a treble is shown in a drawing below;

And this is done after the end hook has been attached –> Pass the wire through the eye of the hook and back along the shank, between the bends of the hook and round the shank and wire five times, finally passing it back through the eye of the treble. On rare occasions, the section of wire between the bends of the hooks can becomes damaged. Usually, this is the result of pulling out a snag. You should always check traces throughly and re-tie all knots everytime you free your tackle from a snag.
Once the second treble is fix to the wire trace, then you repeat the silicone hooks sleeve as you did the first treble.

So your second treble should be like this;

Now all there is left to do is to attach the swivel in the wire trace. But before you do anything, you must work out where to apply the swivel;

As you see, I painted it white so you can see the start of the swivel must go at the begining of the white paint,, but before you start threading anything you must repeat the heating of the wire again;

Heating up the wire will soften the wire, which helps to twist the coil on the main line more neatly. Once the wire is cooled down, the first thing you must do is put a bend in the wire and thread the Fox Crimp Cover down the wire, like this;

Please note that the pointed end of the Fox Crimp Cover must go in first like this;

Then the Fox Power Swivel Number 7 which I used here will also threaded down the wire. After that, make the bend in the wire where you have heated the wire like this;

There are two ways of tying the wire to the swivel. In the diagram below, the top one is the loop version, which looks easy but is really hard to do. But once you get the hang of it, then you will see how easy it looks.
The second one below, where you thread the wire twice through the eye, is simpler to do. In my case, this is the method I prefer to use.

It’s up to you to choose which way to thread the swivel to the wire, hen place the Fox Twiddling stick in the swivel eye like this;

Start turning the twiddling stick up towards you and carry on twisting (about 20 times) until there a nice neat coil wrap around the main trace, like this;

Trim off any excess wire from the coil and apply the trace crimp cover over the swivel like this;


And there you are, the finished product;

Andrew Burgess


