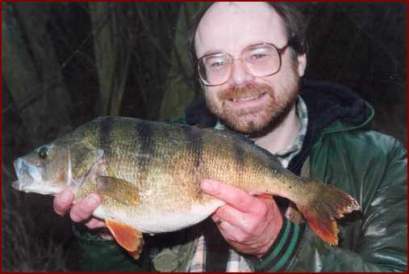
If I had to bet on where the next perch record will come from I’d undoubtedly plumb for a commercial carp fishery.
I’ve already discussed the reasons why many times in the past, but briefly it’s because such waters often hold a huge number of stunted silver fish and just a small head of perch. Couple this with almost nobody fishing for them and you have the recipe for monster stripies.
Location
These waters are usually fairly featureless “holes in the ground” so how do you find the perch? Once again, the key is light intensity. As I’m always saying perch have superior sight to their prey and so feed best in dim light when they can put this to best advantage. This means that in bright conditions they’ll be anywhere that they can find shade. It may be under an overhanging tree or beneath a bridge or tight to a high bank. Failing these or similarly shady spots, fish the deepest water you can find. However, in murky conditions you’ll often find the perch in shallow, open swims, particularly late in the day.

One other factor that I’m beginning to feel is important is undertow. And these shallow, open waters certainly have an undertow! Although the carp and roach like lots of water movement, perch don’t seem to. I used to always fish with the wind in my face (except in very cold conditions when I wouldn’t now bother with perch). However, recent experience has suggested that if the wind is strong I do better by being out of it – or more accurately out of a strong undertow as the two don’t always go together. It’s just possible that tackle control and therefore presentation is adversely affected by undertow but I reckon it’s that the perch actually prefer the quieter water.
Time of day
On every muddy, shallow stillwater I’ve ever fished far and away the best time in winter (when I do most of my perching) has been at dusk. There’s always exceptions of course as Len Head and Alan Pearce will tell you. On their local water the hot period is mid-morning. However, this is the only water I know where this is so. In fact, I’d go as far to say I catch more big perch from shallow stillwaters in the ½ hour either side of sunset than all the other times put together. However, once I can’t see my float any more the feeding spell is usually over as perch very rarely seem to feed at night. I’m not saying that you’ll never catch perch at night, but in my experience it’s simply not worth the effort.
Choice of Bait
Because of the huge head of small roach and rudd in commercial carp waters, the best baits are undoubtedly live and deadbaits. On some of these waters, worms will score but their success rate is usually much lower, at least for the bigger specimens. Indeed, on one such water I fish, worms are next to useless. However, on gravel pits it’s a different matter altogether, but more of that another time. Similarly maggots are not worth the effort, even on waters that are heavily match-fished. True, the odd big perch falls to maggots but when you consider the number of “rod-hours” that they’re used you’ll soon see that other baits are far more productive.
 However, I wouldn’t go perching on a commercial carp water without a large supply of maggots. The reason is that I use them to attract small roach and rudd about 1 to 2 rod lengths out where I can feed accurately. On arrival I put in 2 handfuls of maggots (1 in very cold weather), and by the time I’ve got my tackle sorted out the silver fish should have settled on the bait and be chomping confidently. The first bite is usually instant and, by feeding a dozen maggots every time I get a bite, I soon get the 10 to 12 baits I need for an afternoon session.
I used to use cloudbait as well, but on many commercial waters it’s banned. However I found that this was no disadvantage, and certainly cheaper! In fact, I now reckon that by not using cloudbait I can concentrate the silver fish on the bottom, which has definitely upped the number of big perch caught. To ensure the fish stay on the bottom, once I’ve caught enough baits I step up the amount of feed considerably but cut back on the frequency. As a guide, I feed 3 handfuls of maggots every 20 minutes or so until the light begins to fade when I increase the frequency to every 10 minutes. This means that I get through about 3 pints of maggots in a 4 to 5 hour session, which may seem a lot on a stillwater, but I can assure you it works.
The maggots are always flavoured and I’ve found spicy flavours very successful, especially Archie Braddock’s Exotic powder and the soon to be released Perch Magic liquid. Another excellent liquid is Rod Hutchinson’s Savoury Sense Appeal.
Float Rigs
There is no doubt in my mind that for short range perching you can’t beat float tackle. Float fishing has two big advantages. Firstly, it minimises resistance. Secondly, it means that the bait can easily be twitched. This is particularly important when fishing worm, which as already mentioned I don’t find very successful on commercial carp waters so will leave to a future article.
However, there are two major differences in my presentation compared with the textbooks. The first is that because I’ve concentrated the silver fish on the bottom I usually also fish my baits on the bottom. This is so whether I’m using live or deadbaits. There’s obviously nothing more natural than a deadbait on the bottom or indeed floating (when seagulls usually beat the perch to it!) I therefore normally pierce the swim bladder to release the internal juices and so that the bait sinks. Having said that, there are times when a popped-up deadbait will score and for this of course you don’t pierce the swim bladder.
The second difference is that I use a waggler float in conjunction with a sinking line. The waggler is simply the same as I use for catching baits, but I take off 1 to 2 BB shot according to the size of the bait. The other change is to replace the 18″ light hooklength with a 3lb to 4lb breaking strain trace of 24″. This then means that I’m fishing some 6″ overdepth. I’ve never seen this rig used before but I can tell it’s absolutely devastating! The drag from the sunken line and the hooklength on the bottom slows the livebait down and keeps it in the feeding zone. On the other hand, with a floating line the bait moves too fast and also needs frequent recasting. In fact, when laying on in this way the bait often remains still on the bottom and, if it hasn’t spotted a perch stalking it, the first sign of a take is the float suddenly going down and the line tightening �” so do keep alert!
Talking of the feeding zone brings me to another very important point. You’ll catch far more big perch if you don’t fish your baits on top of the maggots. It’s much better to fish them some 10 �” 20 feet (3 to 6 metres) away. This is because, like lions stalking a herd of zebra, the perch pick off the stragglers on the edge of the shoal. If they charge into the shoal they’ll very quickly get spotted by the many pairs of eyes and just waste a lot of energy.
Leger and Paternoster Rigs
It’s obviously difficult and therefore dangerous to the perch (because of deep hooking) to watch two moving floats simultaneously. Therefore leger or paternoster rigs are essential weapons in my armoury. Indeed, there are occasions when they outfish the float.
Many people confuse legers and paternosters and you’ll see diagrams in a lot of books and magazines calling the same rig by different names. In particular, link legers are often incorrectly called paternosters. Put simply, with a link leger the lead link is shorter than the hook length. On the other hand with the paternoster it’s the other way round, the lead link being longer than the hook length. Whether it’s fixed or running is totally irrelevant to the name. What is important is that with a leger rig the bait (unless it’s popped up) is fished on the bottom. Conversely, with a paternoster rig (unless it’s pulled extremely tight) the bait is fished off the bottom. It’s as simple as that! I firmly believe that we ought to standardise on the names as currently it’s very confusing, especially for beginners.
The most important point to appreciate with rigs is that perch hate resistance. Put resistance into a rig, and 9 times out of 10 perch, unlike carp, will reject the bait. How then do we minimise resistance? Simple! Use a heavy lead!!
This might seem contradictory, but it isn’t if you think about it. If you use a light lead, as is commonly recommended, the lead will move, in which case the fish will immediately feel it. On the other hand, if the lead remains stationary the indicator will move instead �” which is exactly what you want.
The indicators I use are of the drop off variety in conjunction with an Optonic type alarm to give me an early indication of a run. If I happen to overlook the single bleep this gives, I can’t miss the whack as the indicator hits the rear rod rest! One important point is to strike immediately as otherwise the perch will often swallow the bait resulting in deep hooking. If you miss bites try increasing the length of the trace or using smaller baits before leaving a run any longer. With the big bait size of 5 inches that I prefer, missed runs are often from smaller fish anyway.
The leger and paternoster rigs I use are quite simple. The rods are kept made up and all that is attached to the line is a hook, a leger stop and a link leger bead. Various paternosters and link legers (which I store on pole winders) can then be very quickly attached to the leger bead.
The distance between hook and leger stop is obviously important, my starting point being approx 3½ feet. As already mentioned if I get missed runs I increase this length. Conversely, if the perch aren’t feeding well or the water temperature is low I decrease the distance.
As you can see from the diagrams, I use 3 main link leger and paternoster set ups. On shallow commercial carp waters the link leger tends to get most use as it presents the bait on the bottom yet the sunken float lifts the line clear of any obstructions so as to minimise resistance. To fish off the bottom I’d usually use my version of the Vic Bellars sunken float paternoster. The only time I resort to the Colin Dyson rig is when using rudd livebaits as these fish are so lively they they tend to tangle any other set up. As you can see from the diagrams, I can quickly change from a Bellars rig to a Dyson one simply by moving the sliding float stop. Additionally, by tightening the line I can pull the bait nearer to the bottom and vice versa.
The design of the sunken floats is very important. Firstly, I’ve found slim floats minimise the risk of tangling. Secondly, I can’t see the point of green or black sunken floats. I either want my floats to be as invisible as possible – in which case I go for transparent ones. Alternatively, I want the floats to attract the perch when the livebait moves them around, in which case I choose fluorescent red. American anglers have long since found that putting livebaits on jig heads painted in such bright colours can much increase the strike rate, and flourescent red sunken floats are simply an extension of this idea. Finally, I’ll frequently also fill the floats with split shot to create my “Rattle Rig”, which many of you will have read about over the years. The idea here of course is to attract the perch audibly rather than visibly.
I apologise if the foregoing is somewhat dry and detailed. You can certainly see that I’m very particular about getting my rigs exactly right. However, as with all branches of angling this attention to detail can, and indeed sometimes does, make a huge difference to your catches. If this article makes just a few of you think about what you’re doing it will have been well worthwhile. After all, that one fish you miss could be the fish of a lifetime!
Steve’s Rigs (Click for a larger picture)
Running Link Leger
Bellar’s Paternoster
Dyson Paternoster

